
About one year ago I was introduced to the Helicon Focus Filter, and in my July 2005 Tip I showed how this neat piece of software could be used for maximizing an image's depth of field. In our latest book, Digital Nature Photography, From Capture to Output, we discuss the filter as well, but I do have to make a confession here ...
Sometimes, with all the equipment one has, with all the software one may have or be exposed to, well, sometimes it is easy to forget that you have some really great tools at your disposal. And the Helicon Focus filter unfortunately fell into that vat of unused tools!
In the summer I generally have a lot of opportunities to photograph macro subjects and, to facilitate this, I actually have two cameras always at the ready -- one with a 180mm macro lens with a 1.4X tele-converter attached, and another with a 90mm Tilt/Shift Lense with a 1.4X tele-converter. I use the 180 combo for garden and field work where I can get great image sizes at a reasonable working distance, while I use the 90mm combo in-studio most frequently, for shooting great depth-of-field shots of salamanders or snakes where I can roll the depth along the subject's plane. I like using this lens for this purpose so much that it is now the first lens, and method, I think to use when confronted with depth of field problems.
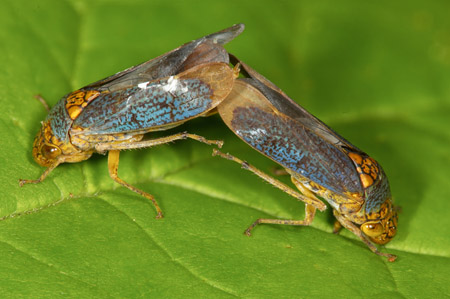
Recently, toward dusk I spotted two 1/8th inch leaf-hopper insects in the process of mating, positioned butt-to-butt. For a few minutes the insects cooperated by being parallel to my digital plane, allowing me to get fairly good depth of field, but the insects then moved, and I was stuck with either having a portion of one insect in focus, or a portion of another. Try as I might to reposition myself to get parallel, a difficult process with the intervening foliage that might shake and alarm the insects, I just couldn't get the right spot. Then a light bulb went off -- I did have the Helicon Focus filter and I could use that! Duh!!!
With that in mind, I shot a series of six or seven images when the insects were still, focusing from the wingtips of the nearest insect amd rolling the focus along with each shot until I ended with the antennae and forelegs of the insect furtherst away. Each shot showed only a small area in focus, but the Helicon Focus filter blended them seamlessly into a final shot that was, one, in complete focus and, two, had a larger image size than I could have obtained when I tried to shoot both insects parallel.


LEFT: Using the filter is as simple as calling it up from your
program menu, then browsing to the images you want to run in the
Source files, which is the image well to the upper left of the
screen shot.
RIGHT: The finished image, with the new file information appearing
in the lower left panel. To get to this point, all I had to do
is hit the RUN button ath the top of the Filter page, and now
all I need do is go to File>Save AS and give the composited
image a new name. What could be simpler?
To use the Helicon Focus filter
your subjects need to be motionless, but when they are, you can
get some great results. I'm looking forward to shooting down the
entire length of a rattlesnake that's lying toward me -- I can't
imagine the depth and the look I'll get!
If you are a macro photographer, I'd seriously look at the advantages you will have with this filter!
| DIGITAL | EQUIPMENT | ADVICE | TRAVEL | WILDLIFE | FIELD TIPS |