The inspiration for this tip was generated by working with and listening to the participants of our Digital - Complete Nature Photo Course and our Introduction to Photoshop CS2 that we conducted in June. In both courses we had a number of students whose greatest concern was Digital Workflow, which included the management of their digital files, RAW conversions, and Adobe Photoshop CS2 work. Many were at a loss as to how much work was required in Photoshop, in terms of what they should be doing with their files after their RAW conversion. By the way, all of these issues are addressed in our latest PDF book, 'Digital Nature Photography, From Capture to Output,' which can be purchased directly from our office.
While it is probably true that virtually any image can be further
'tweaked' and improved in Adobe Photoshop CS2 after the RAW conversion,
that does not necessarily mean that this is really, really necessary.
A good RAW conversion may be perfectly adequate for your needs,
especially if that is posting images to a website or to send an
image via email. A good RAW conversion may be sufficient for a
stock agency or even for a publication, or for a print, assuming
you started with a good exposure. However, there are some things
that most RAW converters can't do or can't do well, and perhaps
the best example of this is the occasional need to clone out dust
spots or distractions. For these, the best option is to go to
Photoshop and clone out these spots.
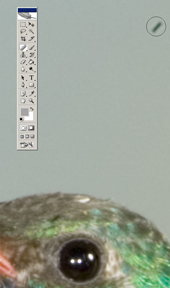
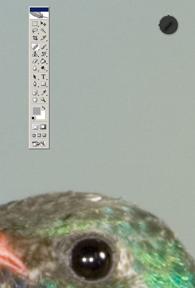
Dust spots, particularly, are an almost universal problem for
a digital shooter. Sometimes those spots cannot be seen because
of the texture and shapes of the image, but in single tone or
texture areas -- a blue sky or a field of snow, for example --
the spots can be obvious and distracting. These must be removed.
Likewise, you might wish to remove a grass blade, stick, pole,
etc. etc. that intrudes into an image. Either way, if removing
the offending object is done incorrectly the image can look as
bad, or worse, than if you allowed it to remain.
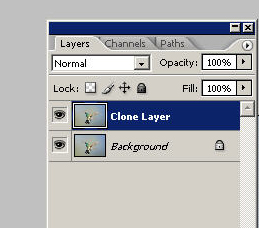
First, make a new layer or copy the background layer and label this new Layer 'Clone Layer,' where you'll do all of your cloning. By cloning on a separate layer you can undo any mistakes by using a layer mask and so that you aren't making changes (which could be potentially destructive) on the primary image layer.
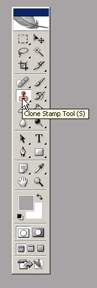
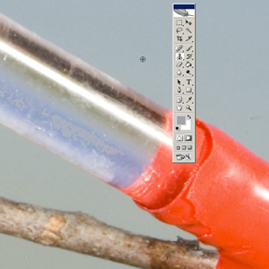
There are three tools that work effectively for removing dust spots or other offenders. Most folks are familiar with the Clone stamp tool, which copies or 'clones' pixels from one spot, that is, it replicates them, and lays those pixels down in another spot. If done poorly, a cloned area can look as if you simply duplicated an area, cut it out and pasted that cut out into a new location. The cloned area doesn't match the surrounding areas but instead looks patched. While we spend a good deal of time teaching effective cloning techniques in both our D-CNPC and our Intro to Photoshop classes, here's a couple of hints to consider for now when you use the Clone Stamp tool.
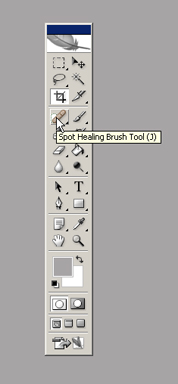
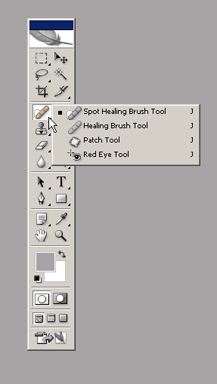
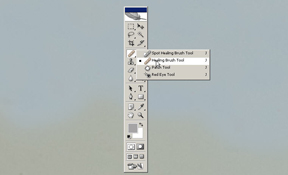
The spot-healing brush is found just above
the Clone Stamp Tool. Like that tool, you'll notice that there
is a little triangle in the lower right-hand corner of the tool
box. Clicking and holding there will reveal the other tool options
hidden in that box. The two we'll use here are the Spot Healing
Brush Tool and the Healing Brush Tool. As you did with the Clone
Stamp Tool, make the size of the Spot Healing Brush Tool just
a bit larger than the 'spot' you wish to remove by using the [
or ] (left bracket or right bracket keys) to resize the brush.
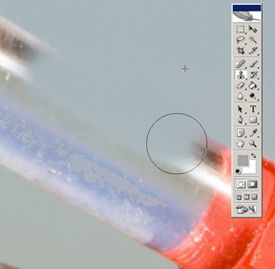
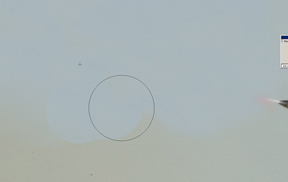
For removing dust spots, size the stamp so that the Clone Stamp is only slightly larger than the dust you are trying to remove. Use the left bracket key ( [ ) to make the clone stamp smaller, and the right bracket key ( ] ) to make it larger. You can also adjust the size of the brush by going to the Clone Stamp's tool bar and selecting the drop-down menu for the brushes, and moving the slider back-and-forth to adjut the size of the brush. However, that's a numerically based resizer and you won't know if you picked the right brush size until you select it and bring your cursor back onto your image. It's easier to use the bracket keys for real-time size adjustments, as you can see the diameter of the brush change right on your image. The left bracket [ is located to the right of the letter P on your keyboard, and the right bracket ] is located immediately to its right, or to the left of the \ backspace key. These [ and ] bracket keys will work to resize any brush, so you can also use this keyboard shortcut to resize a Brush when you're painting into a Mask.
Of course, the Healing Brush and Spot Healing Brush can also be used for cloning, and the Spot Healing Brush is often the best choice for doing so. However, the Clone Stamp tool is often the best tool for cloning larger areas, which might be the case when a background needs to be replaced. For example, you might wish to add some out-of-focus background vegetation into a white hot-spot, or you might wish to remove a telephone pole, wire, jet contrail, etc. from a sky.
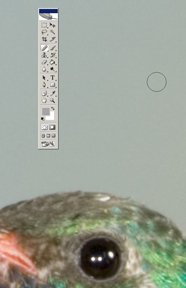
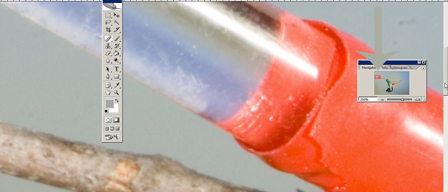
I've resized my SHBT (Spot Healing Brush Tool) to be just a bit larger than the spot to be removed. When I select this spot by clicking on my Left Mouse Button, a dark spot appears momentarily on the image - as if you just made the spot worse! Let go of the Mouse and the dark circle and the dust spot disappear. The SHBT works like a 'black hole' sucking pixels in from the surrounding area, so it works well with areas of uniform tonality. It doesn't work well close to edges, so if this dust spot was close to the hummingbird's head the SHBT may have pulled in unwanted pixels from the bird's head.
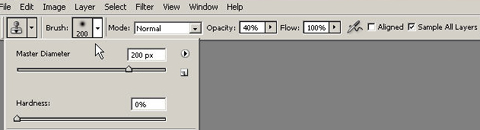 In the Clone Stamp toolbar make sure that you have 'Sample All
Layers' is checked, and experiment with having 'Aligned' checked
or unchecked. If checked, your source area will stay 'aligned'
with the clone stamp as you move along the image, keeping the
same distance and angle throughout. If it is not checked, the
source area stays constant until you Alt Click and choose a new
source for your cloning. Either way, make sure that you resample
often.
In the Clone Stamp toolbar make sure that you have 'Sample All
Layers' is checked, and experiment with having 'Aligned' checked
or unchecked. If checked, your source area will stay 'aligned'
with the clone stamp as you move along the image, keeping the
same distance and angle throughout. If it is not checked, the
source area stays constant until you Alt Click and choose a new
source for your cloning. Either way, make sure that you resample
often.
Make sure you use a soft edge to your Clone Stamp. Use the
stamp's drop down menu and drag the slider to 0%, which is, of
course, 100% softness. This creates a blend or feathery effect
that generally softens the edges of a clone. For critical areas
in tight spots you may need to resize your brush with the [ or
] bracket keys and use a harder brush, even up to 100%, so that
the cloning is very precise and without a feathered blend.
Another key to effective cloning is to reduce the opacity of the
Clone Stamp Tool, so that the clone isn't laying the full intensity
of the clone onto the targeted area. If you reduce the brush's
opacity to 20-50% you'll have to sample-and-clone several times
to achieve 100% opacity, but doing so, and doing so by taking
samples from several source areas, often creates a great blend.
The opacity for the Clone Stamp tool is located on the tool's
tool bar or menu bar at the top of the screen.
The key to effective cloning is to sample often, holding the Alt key down while your mouse is over the source area (the location you're using to clone from) before painting in, or 'cloning' into the targeted area. This, of course, does depend upon your subject and the tonal values of the scene, but generally, and certainly quite frequently, cloning works best if you take several samples, 'dabbing' the clone into a spot as you sample from several slightly different source areas, and 'dabbing' into your targeted area again to make a nice blend. This is especially true with natural textures, like a grassy field or out-of-focus background of leaves, because a multiple-sample clone recreates the natural chaos that is present.
Sometimes after cloning, you may find a hard edge or a bit of unnatural color in the area where you cloned. This can be blended further by either cloning over the area again with the Clone Stamp at a reduced opacity (33% works), sampling from areas of the image where you're hoping to blend the color a bit better.
You can also use the SHBT to help blend these areas. Remember,
the Spot Healing Brush Tool sucks in pixels from around the tool's
edge, blending pixels as it does so. A couple of strokes with
the SHBT is often all you'll need to soften the effect of an edge,
provided it is not in an area where it could draw in pixels from
an unwanted source area.
Another choice is to use the Healing Brush Tool to help blend
in these hard edges. This tool is something of a combination Clone
Stamp Tool (because it uses a source area to 'heal' from) and
a Spot Healing Brush Tool (because it blends the pixels into a
mix). It's found in the hidden tool menu of the SHBT, unless,
by Default, it is the tool that appears in that window. The Healing
Brush Tool's icon is a bandaid; the SHBT's icon is the same bandaid
with a little circle at the bottom. In the hidden menu, both can
be identified by name in addition to the icon. Unlike the SHBT,
the Healing Brush does not leave a dark mark while it is processing
data, but like the Clone Stamp Tool you must first select a source
to draw the 'healing' pixels by Alt clicking that location.
While you 'heal' with either the SHBT or the HBT you'll notice
that the hard demarcation line softens and blends. Occasionally
you may need to use the Clone Stamp Tool at a reduced opacity
to further blend the colors or effect. Don't be afraid to do a
mix of all three.
I work rapidly when I repair an area, switching between tools
as needed and Alt clicking on different source areas repeatedly.
Beginners, I've noticed, often seem so focused and meticulous,
and slow, but the trick is really to just slap pixels in there
to make a pleasing blend. Try working fast, but not sloppily,
and you'll see how easy it is to do a great blending job.
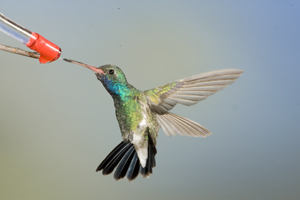
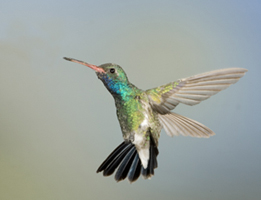
With the feeding tube cloned out, I have a free-flying hummingbird
against a seamless, natural looking background, thanks to effective
use of three tools - Healing Brush, Spot Healing Brush, and the
Clone Stamp.
| DIGITAL | EQUIPMENT | ADVICE | TRAVEL | WILDLIFE | FIELD TIPS |