 Tip of the MonthTip of the Month
Going digital has improved my photography. Although I hope I'm beyond needing to validate an exposure or a composition via my camera's LCD screen, digital has allowed me to experiment and to push my creative envelope. While experimentation and expanded creativity was certainly possible with film, the sheer expense of shooting frame after frame of what could very well be toss-outs precluded my doing so as often as I may have liked. Now, my photo mantra is 'it's only pixels,' and I fire away without the worry or concern that I'm wasting film and money.
All this adds up to having plenty of digital images to go through and edit, and this used to be an onerous chore. I'd tried several programs, but at least at the time I did my first searches for an ideal editing system most of these were not very satisfying or did not read a RAW file. All programs displayed a JPEG, or a JPEG thumbnail, which was certainly adequate for rough editing in assessing a composition and for culling images that were obviously out of focus. But the JPEG interpretation of a RAW file would not discern fine-focus, which is critical if you're intending to only keep your best material. My only solution, until I had my Capture 1 epiphany, was using Adobe Photoshop CS's RAW converter, but that process was laborious. I had to open each image via the RAW converter, zoom in to 100% to discern true sharpness, then exit the RAW converter and either delete that file or move on to the next image, where I repeated the procedure. The process was tedious.
Then I discovered Phase One's Capture 1 RAW conversion program (www.c1dslr.com), and I downloaded the free trial. I'm not one for reading manuals so I skipped C-1's Help menu and just started playing with the program. The interface was intuitive and similar enough to Photoshop's RAW converter that I was able to muddle away for several minutes before I got lost. Stuck, I then started reading the Help menu and discovered the solutions for the hangups I had experienced. Things progressed smoothly after that. Although this might be an unconventional approach to learning, I did find this method (try first/read later) worked well for me because the tutorial answered questions I now had. Within a half hour I was back into the program and within an hour I felt like I was on track.
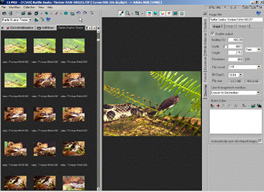
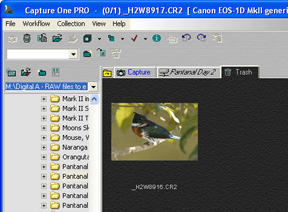
The LEFT red line points
to the position where you can change the Thumbnail size of the
Capture Collection Window. I can adjust the size of this display
so that more, or fewer, images appear. Making it smaller increases
the size of the Preview Window, which I use for rough editing
before checking for critical sharpness.
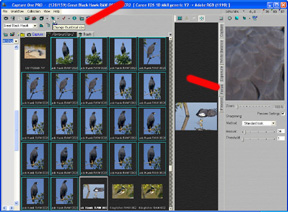
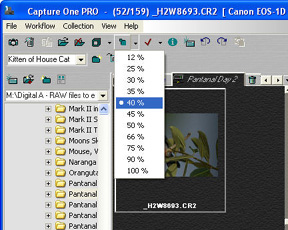
I can also change the actual size of the Capture collection via
the drop-down menu. I'll often take that up to 75% or higher to
do a quick survey of the files, and I'll delete obvious mistakes
at this step.
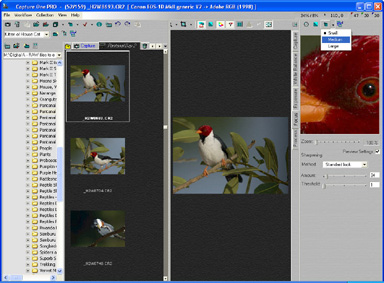
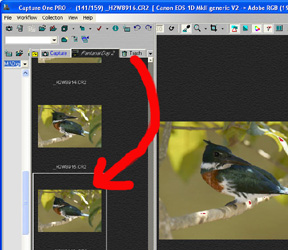
You
can change the size of this focus window, too. In this screen
capture I have a small focus window open, but I'm about to select
the Medium size.
To discern sharpness I simply
hit the Focus tab ( found on the right hand side of the
Capture 1 display) which opens another window which displays a
100% view of a portion of the image targeted by my cursor. The
cursor outlines a square that is displayed at 100% in the Focus
window. It takes about two seconds for my computer to process
and display this enlarged view, which can be scrolled to check
several different spots. If the image is sharp, I simply roll
the scroll wheel on my mouse to move to the next image and repeat
the procedure.
That hour was a very cheap time investment when compared to the hours and hours I've saved by using C-1 for my RAW editing. With C-1, there's no need to double-click on an image to open it for a 100% view. Instead, as I scroll through the thumbnails a larger image appears in the display window. As I would with any other browser, I use this full-view display to make my rough edits and, by simultaneously clicking on my CTRL and T key I can 'tag' selected images. Collecting all my tagged together by going to the main file menu, under 'Collection>Image Tagging>Group Tagged' I can review these tagged images for critical sharpness, and I can do this fast.
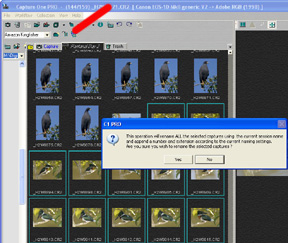
Soft images are removed with the Delete key and and sent to a 'Trash' folder, another tab located behind that of the folder I'm using. Trashed images are stored here, but they are not actually deleted. Instead, they are simply stored in the 'trash' folder, and, in Windows Explorer, the word 'trashed' is added to the file name. Permanently removing the file can be done two ways. I can go to the Trash icon in the Capture One submenu and click, which displays a prompt asking whether I really want to delete the image(s), or I can use Windows Explorer, go to View>Arrange by>Type, and group all of my 'trashed' images together. Selecting these and clicking Delete removes the files permanently.
If I delete an image by mistake I can simply drag that file from the 'Trash' folder back into the folder that is opened, or to another folder I had created. I can also undo a delete in Windows, by removing the word 'trash' from the file name. Later, I can reopen that file in Capture 1. Either way, that's a nice safety check!
Capture 1 has also saved me enormous amounts of time in my batch renaming process as well. Previously I'd batch rename via Photoshop, and once again I found the process slow and relatively cumbersome. In Capture 1 the process is simple. Immediately above the 'Capture' icon (above the thumbnail display window), there's a blank window where the 'next capture name' (hold your mouse over the space or icon for a second or two and the label appears) can be typed. Next to that is a folder icon where you can create or select a 'new session,' but I generally ignore this feature. Next, there's a paper-like icon ('change settings for automatic naming') which, when opened, displays a Preferences dialog box. In that box, under 'Delimiter,' I type a blank space, then the word RAW, and then another blank space. I leave everything else blank or checked with the default settings. The third and last icon, which resembles a stack of papers ('Apply name to selected captures'), applies the name I've typed in the first window to all of the images I've selected in the Thumbnail display. That window, by the way, has a drop down menu that saves all the names I've added, so I can select a previously typed name and apply that again when needed.
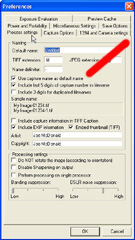
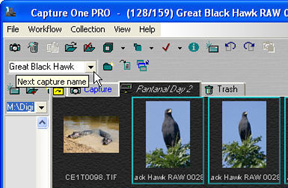
Under Capture 1's main menu, under File>Preferences>Process Settings I had previously checked 'Use capture name as default name' and 'include last 5 digits of capture number in filename' so that each captioned image has its own unique number, the unique number assigned by the camera. Since that number is sequential, I don't have to worry about assigning the same file name or number to a file. The new file name is applied after I click on that last icon ('apply name to selected captures') and my file might read something like this: Great Gray Owl RAW 2235.cr2. The RAW is somewhat superfluous here, since the .cr2 extension already identifies the image as a RAW file, but I've kept that protocol because one of my digital cameras attaches a .tif extension, and this simplifies a cursory inspection of my files. Had I not added the word RAW, Capture 1 would simply attach a number to the end of the file, identifying it as a converted TIFF copy. Personally, I find the word 'RAW' faster and easier to pick out as I'm skimming through files. While describing this entire process of batch renaming takes a few minutes, actually doing it -- after the initial, once-and-done setup, takes only a few seconds. So batch renaming is a breeze.
So, when do we batch rename? Normally, we do so right after we download our images and open up Capture 1. In this way, if we don't have time to do anything else we at least have the files named and we can do further organization and editing at a later time. Further, since this exercise only takes a few seconds, it's really not wasted effort when, as I edit , many of these named files are deleted. In truth, sometimes I batch rename after I've tagged and edited the images, but either way, it's a pretty fast action.
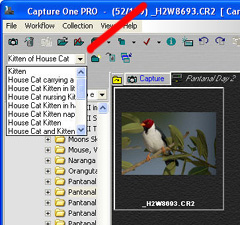
After editing, I'll add a capital 'A' to my real keepers, the ones that I'm planning on converting to TIFFs or JPEGs right away. One could argue that there's no need to keep extras, but coming from a film background where dupes in camera were the norm, I'm still prone to keep an inventory of similar, good images that I might need for a special project. Admittedly, that decision may change with time. To add an 'A' I simply highlight the file name in the Thumbnail view, click, de-highlight the file and type in the letter where the cursor rests. These keepers are all stored in their own, taxonomically specific folders that are inventoried with Extensis Portfolio 7.
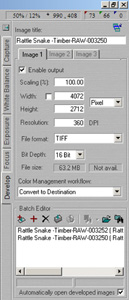 I
do all of my conversions to TIFFs or JPEGs in Capture 1 as well,
adjusting color temperature, exposure, color saturation and color
correction, and levels and curves by way of the White Balance
and Exposure Tabs. After fine-tuning the image, I go to
the Develop tab, select the folder where I'll be saving
the images, and do my RAW conversions. Since Capture 1 developes
images 'in the background,' I can batch develop a whole collection
of images while I continue editing another file. This process
alone is a huge time-saver. Generally, that's the last step I
need to do -- I'm finished with the file because I've taken the
time to 'tweak' my images in Capture 1 it's generally unnecessary
to go into Photoshop and do any further corrections, unless I'm
removing dust or making a composite.
I
do all of my conversions to TIFFs or JPEGs in Capture 1 as well,
adjusting color temperature, exposure, color saturation and color
correction, and levels and curves by way of the White Balance
and Exposure Tabs. After fine-tuning the image, I go to
the Develop tab, select the folder where I'll be saving
the images, and do my RAW conversions. Since Capture 1 developes
images 'in the background,' I can batch develop a whole collection
of images while I continue editing another file. This process
alone is a huge time-saver. Generally, that's the last step I
need to do -- I'm finished with the file because I've taken the
time to 'tweak' my images in Capture 1 it's generally unnecessary
to go into Photoshop and do any further corrections, unless I'm
removing dust or making a composite.
Capture 1 is an absolutely vital part of my workflow, but I didn't realize how important it was until I bought a new camera whose RAW extension was not, at that time, readable. I was going crazy -- and the experience gave me an added appreciation for the speed and effectiveness of Capture 1. Rather than wasting time editing with a slow and cumbersome system, I solved this problem by simply downloading the images while I was on the trip, knowing that the file would eventually be recognized by Capture 1. By the time I returned home, it was.
| DIGITAL | EQUIPMENT | ADVICE | TRAVEL | WILDLIFE | FIELD TIPS |