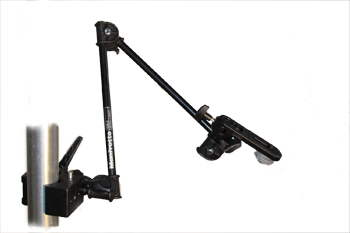
One of the most versatile pieces of equipment I own is the Bogen Articulated Arm. I use it for holding flashes, sometimes for supporting a camera, and often for holding a prop or securing a hummingbird feeder at one of our Arizona or Costa Rica hummingbird sets. I've used these arms for years, yet I'm surprised, each year, when I showcase the equipment needed for our hummingbird setups how few people know about them.
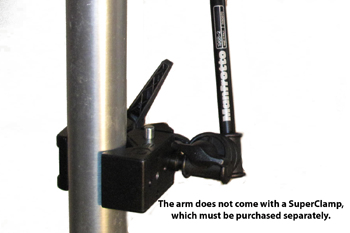
I was first introduced to these Bogen arms at the start of my photo career over 25 years ago. I had purchased a beefier model that's still available, the Bogen Magic Arm (model 2930) from a local camera store, drove home, opened the box, and found that I was missing the vital piece of equipment necessary to use it -- the Bogen Super Clamp that attaches to the other end! I drove back, bought the second piece, and was in business.
Since then the Bogen Magic Arm has been improved with a similar model, the Bogen Variable Friction Arm (model 2929) that uses a knurled knob that, by rotating, gradually tightens the joints and locks the Arm into place. With the original model, the Magic Arm, a single lever accomplishes this, but the transition from loose to locked is rather abrupt, and without care the angle and position of the Arm may move while locking. This doesn't happen with the Variable Friction Arm, so for my money it's worth the slightly higher expense.
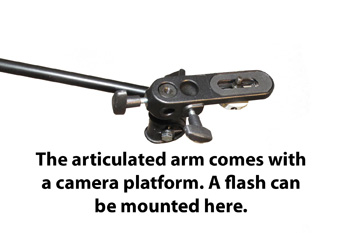
All three models are called 'Arms' because they function quite similarly to our human arm in terms of movement. On one end is a detachable Camera platform with a 1/4 - 20 screw thread. On the other end is a bare stud, onto which one normally mounts the Super Clamp. The end with the camera platform functions like a wrist -- think of the platform as the hand; the other end is the shoulder joint - the super clamp being the shoulder, and the juncture in the middle is the elbow of both arms. Just as your hand and arm can twist and bend in an almost infinite number of directions, so too can all three of these Bogen Arms, which makes placement of flashes or accessories very, very flexible.
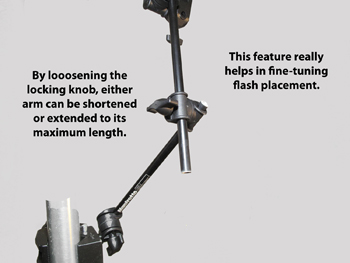
While I've just described all three Arms, my recommendation for newcomers is the least expensive of the three, the Articulated Arm. In this model, there are three different controlling levers for controlling the movement of the wrist, elbow, and shoulder joints. While that may seem cumbersome compared to the one locking lever of the Magic Arm, or the variable friction knob of the Variable Friction Magic Arm, and it is a bit slower to use, those disadvantages are offset by the control you have. With either of the other two, you must have the Arm's position set exactly where you want it when you lock it into place. If an adjustment needs to be done, the lock must be loosened and the fine-tuning done, at the risk of the other joints going out of place.
With the Articulated Arm, if I need to raise the flash a bit all I need do is loosen one joint -- perhaps the elbow, perhaps the wrist -- and move the flash into place. After doing so, I might find I'm still 'off' by a bit, and I might loosen another joint, maybe the shoulder this time, and do my fine-tuning. While this takes longer than doing the adjustment by loosening an Arm with just one knob, I think you can see that this also allows very precise and methodical adjustment changes.
The Articulated Arm is the least expensive of the three Arms and, as I said, perhaps the one to start with if you're thinking of doing a flash setup for macro or hummingbird photography. Most of our Arizona Hummingbird flash setups use the Articulated Arm, and I also use these for supporting the tube feeder used as bait. Accordingly, each hummer set uses at least 5 Articulated Arms.
If you find that you need the stronger, and heavier, Magic Arm I can assure you that your Articulated Arm won't be neglected. You'll still use it for holding props, or a flash, or a feeder, while the stronger Magic Arms (I'd recommend the Variable Friction model) support your heavy flashes. By the way, I'm talking about heavy flashes here -- studio model types. The Articulated Arm will easily support any hotshoe-style flash -- Canon, Nikon, Vivitar -- that you'd normally use for hummingbird work.
Do I love these things? You bet! For years, and virtually since I started in photography, I've owned about six, and those carried me through the beginning of my wildlife photography career. Those Arms still work -- they are beat up, sticky with tape from attaching props like sticks or branches, but they work. Now, as we conduct our hummingbird shoots where we have at least six or seven sets going, and often more for remote projects or off-location, portable shoots we do for kangaroo rats, owls, or whatever, well I now carry over 30 Arms of various types, and about 40 Super Clamps to mount them to.
 Why
more Super Clamps? Sometimes I replace the detachable camera platform
(where I mount the flashes) with another Super Clamp so that I
have one on either end. One attaches to whatever support I'm using
-- a chair, light pole, tripod leg, etc., and the other clamps
onto a prop I wish to support -- perhaps a branch or a background
panel. If you own several Arms, chances are you'll want to get
an extra Super Clamp or two.
Why
more Super Clamps? Sometimes I replace the detachable camera platform
(where I mount the flashes) with another Super Clamp so that I
have one on either end. One attaches to whatever support I'm using
-- a chair, light pole, tripod leg, etc., and the other clamps
onto a prop I wish to support -- perhaps a branch or a background
panel. If you own several Arms, chances are you'll want to get
an extra Super Clamp or two.
Good camera stores should have all of these Bogen products in stock, as will the various catalog stores. I order mine from my favorite store, Allen's Camera (215 - 547-2841), whose prices match and usually beat NY catalog super stores, and the service is always first class.
RAW Shooters Beware!
DEC - A solution to the Digital Dilemma
Western Digital portable external Hard Drives
CS3 Upgrade
Framing with a Telephoto Against a Desert Sunrise
Adobe
Photoshop LIGHTROOM
Workflow
and Workload - You Can Keep Ahead
Bring
along a Point N Shoot
Backing Up Your
Digital Files - you'll need more than you think
Action
Wildlife Photography Camera Settings
HELICON FOCUS
Filter maximizing depth of field digitally
Capture 1's
Most Useful Features
DIGITAL
Photographing scenes with extreme exposure values
Effective
Cloning in Adobe CS2
Watch Your Backgrounds
- The potential of composites or shooting in RAW format
DIGITAL
-Shoot for the Future
DIGITAL-Shoot
for the Future, Part II
The
Helicon Focus Filter Revisited
Explore
Every Angle
Smell the Roses
Frankly access your skills before deciding upon a workshop
The Songs of Insects - a super book on katydids, cicadas,
and grasshoppers
A
Great Insect Field Guide
Action
Wildlife Photography Camera Settings
The
Pond-A Must-See shooting Location in southern Arizona
Don't
take in baby wild animals
Seize the Moment!
Take
a Workshop First
Luck, what is it?
At the Pulse
of Life by Fritz Polking
Carry-on
Luggage for small commuter flights
Three
New Products
Two
New Ballheads from Acratech
Lens
Coat equipment covers
The Ultimate
Long Lens Case - McDonald Safari Bag
Positioning your Roll-on
Carry-On bag
New
Lens Covers for Long Lenses
The
Best All-Around Lens
Keep Your Head Up
Save Your Equipment from
Crashing!
The L-Bracket,
the ultimate camera bumper
Visual
Echos Tele-Flash for the 580EX Flash
Testing
your Flash's Aim
The Ultimate
Flash Bracket
Using
TTL flash with Hummingbirds
Specular
highlights and the flashing frog
Geared Focusing Rail
for Macro Work
Shooting
in Inclement Weather
Low
level tripod work
Sighting in a very, very
long lens
Padding
Your WimberleyTripod Head
Using The Wimberley
Gimbal head with a camera body
Wimberley
400 and 600mm IS plate
How
do we protect our gear from dust, and carry our gear when on safari
How do
you shoot the Moon?
If
you see it, it's too late -- a lesson in anticipation
Protecting
your long lens from SAND, the pleasures of beach photography
Maximum
Depth of Field and Hyperfocal Distance - they're not the same
thing!
A
great depth of field guide
Carry Your Gear!
Custom Function 4-1
for Nikon and Canon shooters
Sigma's 120-300 f2.8
APO zoom telephoto lens
A Car
Tip that could Save Your Life
A Great Website for Information
- the Singapore Nature Photography Society
Airline
Carry-On Luggage -Let your concerns be heard!
Ask Questions Before You
Go
Liquids
in your Levels - TSA Warnings!
Disconnect
-- travel precautions
Photograph America
Newsletter
Obey
the Rules
Wildlife
Portraiture
Drying out boots
with newspaper
Removing
Cactus Spines
The
Ti Chi Stalk
Photographing
Critically Endangered Sites
The Sibley
Bird Guides
Contact us by e-mail: info@hoothollow.com
Or FAX us at: (717) 543-6423.