

Tip of the Month
Batch Renaming in Bridge and CS5
June 2010
With the introduction of Photoshop CS5, Rick Holt, Mary Ann McDonald, and I (Joe) decided it was time to update our ebook, Digital Nature Photography, From Capture to Output.
Like our first edition, we feel that there is no better book on the market that covers everything a digital nature photographer needs to know ... from making the images to the daunting tasks of workflow.
One very easy aspect of workflow, that can make your image management so much easier, is simply renaming your images. Here's an excerpt from our upcoming Second Edition, and I hope it illustrates the thoroughness of this text!
Batch Renaming
Let’s assume that you have all of your images of one subject selected. To rename the images, go to the Bridge Tool Bar and click Tools and a drop down menu appears. The first item in that menu is Batch Rename. Click on it, and the Rename dialog box appears, but the options Adobe provides by Default are not the ones you want to use.
You can also get to the Batch Rename menu via a shortcut on the Bridge application bar, where there are a series of icons starting with a left-pointing arrow and ending with a folder-looking icon that represents the Output module.

Caption: The tool bar has a drop-down shortcut to batch rename, or you can go to Tools>Batch Rename. You might find one more convenient than the other.
Regardless of how you get there, here’s what the Batch Rename dialog box looks like.
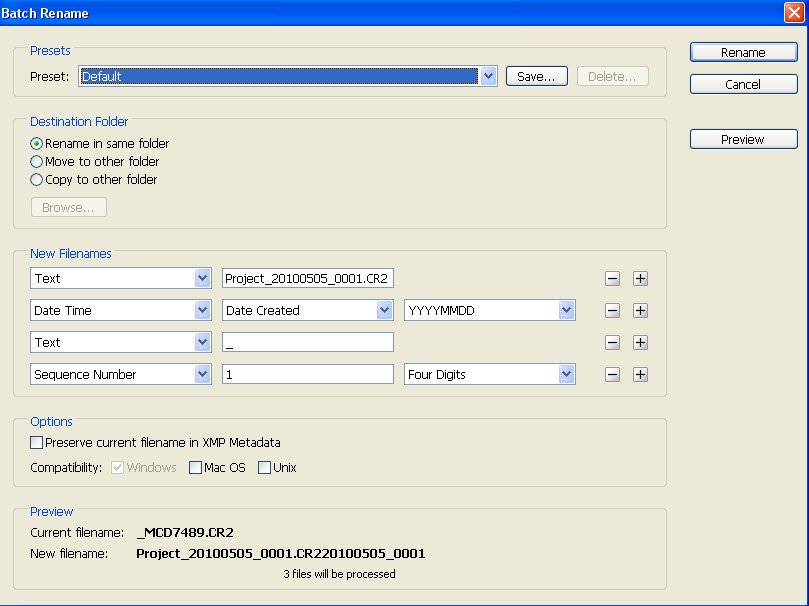
Caption: The default Batch Rename dialog box.
Let’s look at the options available here. In the first field, Presets we’ll customize our renaming settings and save them by clicking Save and typing in a name for the new settings. Keep it simple, call it ‘Renaming Files.’ If you omit this step it is no big deal, as the Preset window will simply appear as Last Modified when you open this dialog box again. For the Destination Folder field, stay with the default choice, Rename in same folder. The big changes will occur in the New Filenames box, and here we want you to follow our directions exactly. You’ll note that beside each text field there is a + and a – box. Clicking on a + box adds another Text field, while clicking on a – box takes that box away.
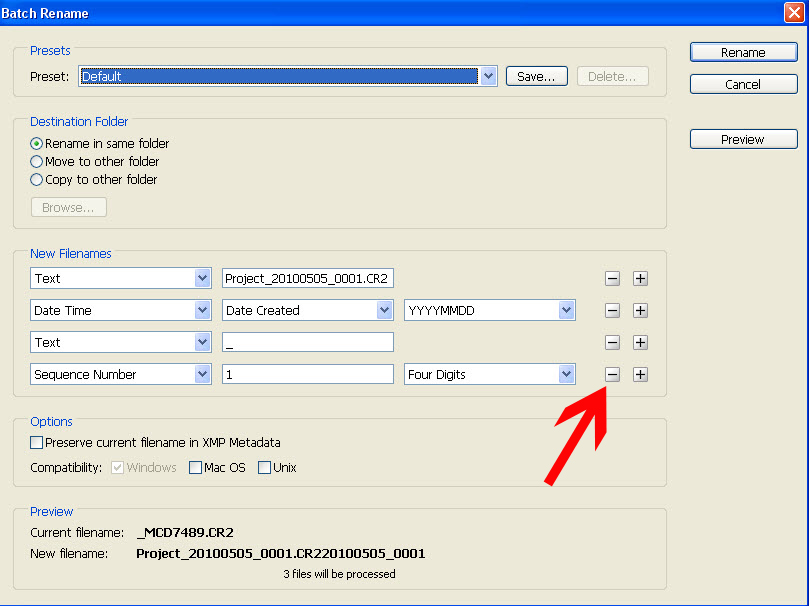
Caption: Clicking on the – button collapses that row.
Click on all of the – boxes until you’re left with the top text field, and in the box type in the name of the subject. We’ll type in Acorn Woodpecker. Now, click on the + button, and a new Text box appears, and here type in an underscore line ( _ ). We’re doing this to separate the subject name from what will appear next, so click on the + button again and another Text box appears. Note, however, that there is a blue arrow next to all of these text boxes, and if you click on the arrow a drop-down menu appears. Click, and scroll the mouse down until you get to Metadata. In the adjacent window you’ll see the first Metadata choice appear, the Aperture Value, but note that there is a blue check mark for another drop-down menu. Most of the metadata options are pretty useless, but the one you want, Image Unique ID, is terrific. By selecting this choice you’ll have your camera’s assigned number attached to your text name, so each file name is quite unique. While it is possible that you could roll over your continuous file numbering from 9999 to 0001 and have an Acorn Woodpecker with the same number, the possibility is extremely remote. Should you think that’s an issue, add the letter ‘A’ in the second line of text, or ‘11’ or ‘2010’ denoting the year, or some other unique mark that identifies the file. We don’t bother and have never had a problem with our filing system.
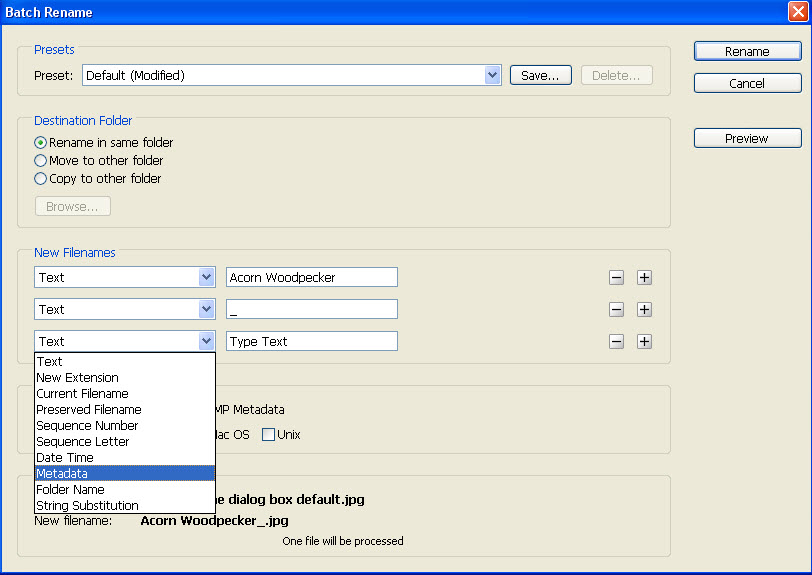
Caption: For the third row, use the drop-down menu and select Metadata.

Caption: In the drop-down menu, select Image Unique ID.
Contact our office for the book's release date, price, and ordering information!
Previous Tips, July 2009 onward
Alternate Uses of some Bogen Products
Hoodman Products
Using High ISO and Live View for Focusing in Dim Light
Art Print Scams for Hungry Photographers
Hungry Vultures ruin vehicles in the Everglades
Use a Short Lens for Depth of Field
Get Professional Help!
Mini-Molar Bag
Access America Trip Insurance
Bogen Base for Macro Work
Archived Tips of the Month
prior to July 2009
Most of my original Tips of the Month for the last several
years are available through this link. The 'look' is from my
original web site, although if I ever have enough time I might redo these pages to match the new web site But that's not a high priority.
Tip of the Month
Batch Renaming in Bridge and CS5
June 2010
With the introduction of Photoshop CS5, Rick Holt, Mary Ann McDonald, and I (Joe) decided it was time to update our ebook, Digital Nature Photography, From Capture to Output.
Like our first edition, we feel that there is no better book on the market that covers everything a digital nature photographer needs to know ... from making the images to the daunting tasks of workflow.
One very easy aspect of workflow, that can make your image management so much easier, is simply renaming your images. Here's an excerpt from our upcoming Second Edition, and I hope it illustrates the thoroughness of this text!
Batch Renaming
Let’s assume that you have all of your images of one subject selected. To rename the images, go to the Bridge Tool Bar and click Tools and a drop down menu appears. The first item in that menu is Batch Rename. Click on it, and the Rename dialog box appears, but the options Adobe provides by Default are not the ones you want to use.
You can also get to the Batch Rename menu via a shortcut on the Bridge application bar, where there are a series of icons starting with a left-pointing arrow and ending with a folder-looking icon that represents the Output module.
Caption: The tool bar has a drop-down shortcut to batch rename, or you can go to Tools>Batch Rename. You might find one more convenient than the other.
Regardless of how you get there, here’s what the Batch Rename dialog box looks like.
Caption: The default Batch Rename dialog box.
Let’s look at the options available here. In the first field, Presets we’ll customize our renaming settings and save them by clicking Save and typing in a name for the new settings. Keep it simple, call it ‘Renaming Files.’ If you omit this step it is no big deal, as the Preset window will simply appear as Last Modified when you open this dialog box again. For the Destination Folder field, stay with the default choice, Rename in same folder. The big changes will occur in the New Filenames box, and here we want you to follow our directions exactly. You’ll note that beside each text field there is a + and a – box. Clicking on a + box adds another Text field, while clicking on a – box takes that box away.
Caption: Clicking on the – button collapses that row.
Click on all of the – boxes until you’re left with the top text field, and in the box type in the name of the subject. We’ll type in Acorn Woodpecker. Now, click on the + button, and a new Text box appears, and here type in an underscore line ( _ ). We’re doing this to separate the subject name from what will appear next, so click on the + button again and another Text box appears. Note, however, that there is a blue arrow next to all of these text boxes, and if you click on the arrow a drop-down menu appears. Click, and scroll the mouse down until you get to Metadata. In the adjacent window you’ll see the first Metadata choice appear, the Aperture Value, but note that there is a blue check mark for another drop-down menu. Most of the metadata options are pretty useless, but the one you want, Image Unique ID, is terrific. By selecting this choice you’ll have your camera’s assigned number attached to your text name, so each file name is quite unique. While it is possible that you could roll over your continuous file numbering from 9999 to 0001 and have an Acorn Woodpecker with the same number, the possibility is extremely remote. Should you think that’s an issue, add the letter ‘A’ in the second line of text, or ‘11’ or ‘2010’ denoting the year, or some other unique mark that identifies the file. We don’t bother and have never had a problem with our filing system.
Caption: For the third row, use the drop-down menu and select Metadata.
Caption: In the drop-down menu, select Image Unique ID.
Contact our office for the book's release date, price, and ordering information!
Previous Tips, July 2009 onward
Alternate Uses of some Bogen Products
Hoodman Products
Using High ISO and Live View for Focusing in Dim Light
Art Print Scams for Hungry Photographers
Hungry Vultures ruin vehicles in the Everglades
Use a Short Lens for Depth of Field
Get Professional Help!
Mini-Molar Bag
Access America Trip Insurance
Bogen Base for Macro Work
Archived Tips of the Month
prior to July 2009
Most of my original Tips of the Month for the last several
years are available through this link. The 'look' is from my
original web site, although if I ever have enough time I might redo these pages to match the new web site But that's not a high priority.