

Tip of the Month
RangeIR Remote Sensor
January-February 2012
In my most recent Story Behind the Photograph I explain how I photographed barn swallows flying towards the camera, photographed via an unmanned system while I was doing something else, probably charity work. Some critics argue that 'this isn't photography' because the shooter isn't behind the camera, but I think that disparagement is absurd. A heck of a lot of preparation, vision, equipment, and over-all photographic skill is involved in many setups and, unlike traditional photography with the shooter behind the camera, there is nothing so simple as just being able to 'point and shoot.'
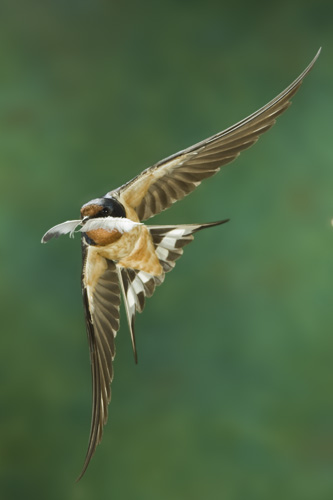
I don't mention this to discourage you from unmanned photography. The point behind the barn swallow story is that it is impossible to react quickly enough to capture many animal behaviors, like the flying swallows, via your human reaction time. This unmanned, remote sensor photography is challenging and fun, and I can assure you that it isn't done very often, especially not very well, so images made in this manner are unique. However, getting these types of images just got a whole lot simpler with the introduction of a brand new remote or unmanned triggering device, the RangeIR.
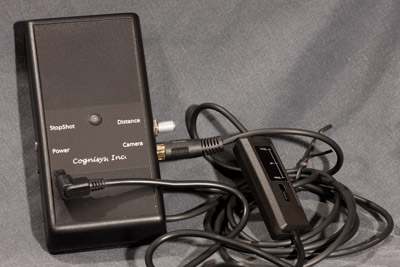
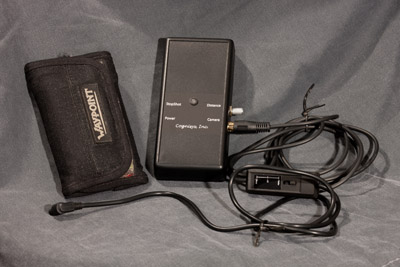
The RangeIR is an infrared device that acts as both a transmitter, emitting the infrared beam, and a receiver, when the subject breaks the beam and bounces the signal back to the receiver. The best thing about the device is its size -- just barely larger than my wallet.
I've used several different camera and/or flash tripping devices over the years (since 1980, at least), and the handicap I've always had with previous devices is either their size and weight, or the need to use a reflector opposite the transmitter for a beam to break in order for the device to send a signal to the camera. Reflectors were especially troublesome, because the camera angle had to be such that either the transmitter, or the reflector, was not in the frame. In some cases, this required that I placed a reflector above the path of my subject and the transmitter below, if I wanted to get a side-view shot. Otherwise, the reflector would appear in the image. Weight has been the other issue, especially if I was traveling overseas. And, if the equipment required a large battery, there was always the potential hassle with security. Consequently, I've kept these devices at home.
Neither of those issues will be a problem with the RangeIR. The RangeIR has a control dial for the output of the IR beam, from about .25 meters to 10 meters and does not need a reflector for triggering. As I write this, I'm envisioning a setup I do in Arizona at a water set where, each night, gray foxes, raccoons, or ringtails (cat) come to drink. With the RangeIR I'll now be able to aim the sensor exactly where I want it, and not have to worry about objects in the background that, previously, reflected back and triggered my system.
The operation of the RangeIR is extremely simple, and the manufacturer calls it their 'point n shoot' sensor. It is that easy, but I hate that phrase! Anyway, here's what you need to do. Aim the RangeIR on the pathway of a subject. Adjust the intensity of the IR via its dial, and plug in the camera interface cable into the electronic release port of the camera, and turn on the camera! When something passes in front of the IR beam, the system fires.
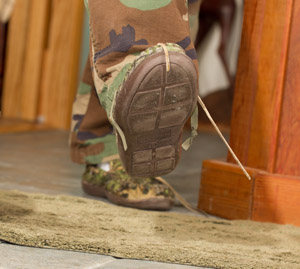

I just received my RangeIR and with miserable Pennsylvania weather I didn't have a chance to set up the system outdoors. I had grand plans to photograph jumping squirrels, flying songbirds, and wild turkeys. Snow and rain nixed those plans, since the entire camera/flash/beam setup would need to be covered from the weather. Instead, I played with the gear indoors, which I'd recommend everyone do, anyway, so that you get familiar with the system and you can trouble-shoot in a benign and less stressful environment. So, I first tested the system as I walked through the beam, in anticipation of our cat, Shaba, doing the same thing. I walked slower than Shaba runs, and although the shot of her looks fine she is actually soft -- the focus is centered behind her shoulders and her face is actually badly out-of-focus. This illustrates two points: One, the system works, and I got a shot! Two, there is a LAG TIME (addressed in my barn swallow story) and several shots may be required to determine where your subject will be, or how far it traveled, between tripping time and actual camera-firing time. This lag time is not an issue if a camera is on Bulb and a flash is wired into the RangeIR, but I was doing this during the day when ambient light precluded that method.
So it is as simple as that. Simply plug in the RangeIR, guess or determine the distance your subject will travel, focus at that position, set your exposure -- either with ambient light or, as I've done here, with flash, and you are ready to go. The RangeIR operates on two AA batteries, and with its small size it can be taken anywhere. The price is terrific, too, at $175 it is the least expensive sensor I've worked with. But it gets even better.
In my two examples (my foot and my cat) the direction of travel is towards the camera. One of the biggest headaches of camera-tripping systems is that a camera (or flash) will fire whenever something breaks the beam, whether it is coming towards or going away from the camera. If this were a real test, I wouldn't be too interested in butt shots of Shaba. I'd like to only photograph her as she walked towards the camera. Cognisys-ink, the maker of the RangeIR, has a solution for this. Another product they make is called the StopShot, and it is a small control panel that is simply incredible. With the StopShot and two RangeIRs, I could program the StopShot so that the camera fires only when my subject is coming towards the camera. Here's how this works:
You'll need two RangeIRs. We'll call one A, and the other B. Programming the StopShot, I can set the device so that Shaba must first break B's beam before breaking A's beam. StopShot then allows the camera to fire. If Shaba is walking towards me, she'd walk through B, then A, and then the camera would fire. If she was walking away from me, she would walk through A first, then B, and the camera wouldn't fire.
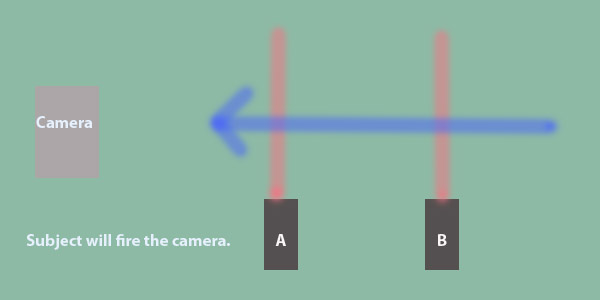
Both RangeIR A and RangeIR B would be plugged into the StopShot. When the beam at B is tripped, the system is alerted and, if A's beam is broken in a preset amount of time, the camera will then fire. The StopShot can be programmed so that if A isn't broken within a certain period, B will reset itself. Otherwise, what could happen is B is broken but the cat turns around or backs up or moves off to the side, and A stays armed. By programming for this, A disarms after a set period and you're ready for the next pass. In this example, the camera is hard-wired to the StopShot, and not to the Ranges, which are also plugged into the StopShot.

Here's the other scenario. Shaba walks past the camera and trips RangeIR A, then continues and trips B. Because I programmed the StopShot so that B must be triggered first, the camera doesn't fire. Imagine the application of this with my barn swallows! Every time a swallow flew away from the camera nothing would happen. Otherwise, without this system, every time a swallow flew in either direction (towards the camera or away from the camera) the camera would fire. This ends up eating up memory card space and draining flash batteries.
Imagine how this could apply with a wary subject like an ocelot in the Pantanal. If my ocelot walked from A to B and the camera fired, I'd get a tail end view and, quite likely, the only chance at photographing the ocelot might be wasted as the flash or the sound of the camera firing might frighten the cat. If instead nothing happened, later, the ocelot might turn around and use the same trail, going from B to A, and I'd get the photo!
Of course, you can also program the StopShot to fire for a subject going from A to B (the tail end, in the above example), or to fire when either A or B was broken (imagine covering a broad area, like a bobcat feeding upon a deer carcass and tugging and hopping around the carcass), or when both A and B are broken simultaneously, in a X pattern where precise positioning is needed. Any scenario you're faced with, you can program the StopShot to deal with those parameters. That's pretty darn versatile!
So that's the RangeIR ! I leave in less than 24 hours for Africa and India, and I'm taking my RangeIR with me, where I hope to do some setups on nocturnal animals around our camps. If I have luck, you'll be seeing those images later.
A final word about the StopShot. If you visit their web site, you'll see that there are a huge number of accessories available, from lasers to passive infrared, sound trippers to vibration detectors, and I hope to be able to illustrate the application of these accessories in later postings. I haven't yet explored another product, the StackShot, which is designed for macro photography, especially in conjunction with software like the HeliconFocus. If you're interested in macro, check it out! I've used HeliconFocus for maximizing depth of field with macro subjects, and I'm hoping to do so with the StackShot. The results look incredible -- see for yourself.
If you are interested in this type of equipment but you know little about flash, or about how this type of gear can be used, either in studio or in the field, you might like to consider one of my Personalized Photography sessions. If we're not traveling, they can be scheduled fairly easily. Please contact our office.
Previous Tips, July 2009 onward
Gitzo Monopod 5561T Monopod
Easy Macro with Extension Tubes and Zoom Lenses
FotoSharp Camou Rain Covers
Canon 17mm T/S Lens
Locking Button for the Canon 7D
NIK HDR Program
Silver Efex Pro for Black and White Images
Beware the DELL Software Solution Rip Off
How and What We Pack for Trips
Canon Digital Learning Center
The Movie Mode with the Canon Mark IV
Batch Renaming in Bridge and CS5
Alternate Uses of some Bogen Products
Hoodman Products
Using High ISO and Live View for Focusing in Dim Light
Art Print Scams for Hungry Photographers
Hungry Vultures ruin vehicles in the Everglades
Use a Short Lens for Depth of Field
Get Professional Help!
Mini-Molar Bag
Access America Trip Insurance
Bogen Base for Macro Work
Archived Tips of the Month
prior to July 2009
Most of my original Tips of the Month for the last several
years are available through this link. The 'look' is from my
original web site, although if I ever have enough time I might redo these pages to match the new web site But that's not a high priority.
Check out our latest website,
mcdonaldwildlifephotos.com
where we'll be adding portfolios and eventually building up
a searchable data base for photo buyers. We've just started,
and the selection is limited, but it is still worth a visit!
Office Phone: (717) 543-6423
Or FAX us at: (717) 543-5342
Previous Tips, July 2009 onward
Extension Tubes and Zoom Lenses for easy Macro
FotoSharp Camou Rain Covers
Canon 17mm T/S Lens
Locking Button for the Canon 7D
NIK HDR Program
Silver Efex Pro for Black and White Images
Beware the DELL Software Solution Rip Off
How and What We Pack for Trips
Canon Digital Learning Center
The Movie Mode with the Canon Mark IV
Batch Renaming in Bridge and CS5
Alternate Uses of some Bogen Products
Hoodman Products
Using High ISO and Live View for Focusing in Dim Light
Art Print Scams for Hungry Photographers
Hungry Vultures ruin vehicles in the Everglades
Use a Short Lens for Depth of Field
Get Professional Help!
Mini-Molar Bag
Access America Trip Insurance
Bogen Base for Macro Work
Archived Tips of the Month
prior to July 2009
Most of my original Tips of the Month for the last several
years are available through this link. The 'look' is from my
original web site, although if I ever have enough time I might redo these pages to match the new web site But that's not a high priority.
Tip of the Month
RangeIR Remote Sensor
January-February 2012
In my most recent Story Behind the Photograph I explain how I photographed barn swallows flying towards the camera, photographed via an unmanned system while I was doing something else, probably charity work. Some critics argue that 'this isn't photography' because the shooter isn't behind the camera, but I think that disparagement is absurd. A heck of a lot of preparation, vision, equipment, and over-all photographic skill is involved in many setups and, unlike traditional photography with the shooter behind the camera, there is nothing so simple as just being able to 'point and shoot.'
I don't mention this to discourage you from unmanned photography. The point behind the barn swallow story is that it is impossible to react quickly enough to capture many animal behaviors, like the flying swallows, via your human reaction time. This unmanned, remote sensor photography is challenging and fun, and I can assure you that it isn't done very often, especially not very well, so images made in this manner are unique. However, getting these types of images just got a whole lot simpler with the introduction of a brand new remote or unmanned triggering device, the RangeIR.
The RangeIR is an infrared device that acts as both a transmitter, emitting the infrared beam, and a receiver, when the subject breaks the beam and bounces the signal back to the receiver. The best thing about the device is its size -- just barely larger than my wallet.
I've used several different camera and/or flash tripping devices over the years (since 1980, at least), and the handicap I've always had with previous devices is either their size and weight, or the need to use a reflector opposite the transmitter for a beam to break in order for the device to send a signal to the camera. Reflectors were especially troublesome, because the camera angle had to be such that either the transmitter, or the reflector, was not in the frame. In some cases, this required that I placed a reflector above the path of my subject and the transmitter below, if I wanted to get a side-view shot. Otherwise, the reflector would appear in the image. Weight has been the other issue, especially if I was traveling overseas. And, if the equipment required a large battery, there was always the potential hassle with security. Consequently, I've kept these devices at home.
Neither of those issues will be a problem with the RangeIR. The RangeIR has a control dial for the output of the IR beam, from about .25 meters to 10 meters and does not need a reflector for triggering. As I write this, I'm envisioning a setup I do in Arizona at a water set where, each night, gray foxes, raccoons, or ringtails (cat) come to drink. With the RangeIR I'll now be able to aim the sensor exactly where I want it, and not have to worry about objects in the background that, previously, reflected back and triggered my system.
The operation of the RangeIR is extremely simple, and the manufacturer calls it their 'point n shoot' sensor. It is that easy, but I hate that phrase! Anyway, here's what you need to do. Aim the RangeIR on the pathway of a subject. Adjust the intensity of the IR via its dial, and plug in the camera interface cable into the electronic release port of the camera, and turn on the camera! When something passes in front of the IR beam, the system fires.
I just received my RangeIR and with miserable Pennsylvania weather I didn't have a chance to set up the system outdoors. I had grand plans to photograph jumping squirrels, flying songbirds, and wild turkeys. Snow and rain nixed those plans, since the entire camera/flash/beam setup would need to be covered from the weather. Instead, I played with the gear indoors, which I'd recommend everyone do, anyway, so that you get familiar with the system and you can trouble-shoot in a benign and less stressful environment. So, I first tested the system as I walked through the beam, in anticipation of our cat, Shaba, doing the same thing. I walked slower than Shaba runs, and although the shot of her looks fine she is actually soft -- the focus is centered behind her shoulders and her face is actually badly out-of-focus. This illustrates two points: One, the system works, and I got a shot! Two, there is a LAG TIME (addressed in my barn swallow story) and several shots may be required to determine where your subject will be, or how far it traveled, between tripping time and actual camera-firing time. This lag time is not an issue if a camera is on Bulb and a flash is wired into the RangeIR, but I was doing this during the day when ambient light precluded that method.
So it is as simple as that. Simply plug in the RangeIR, guess or determine the distance your subject will travel, focus at that position, set your exposure -- either with ambient light or, as I've done here, with flash, and you are ready to go. The RangeIR operates on two AA batteries, and with its small size it can be taken anywhere. The price is terrific, too, at $175 it is the least expensive sensor I've worked with. But it gets even better.
In my two examples (my foot and my cat) the direction of travel is towards the camera. One of the biggest headaches of camera-tripping systems is that a camera (or flash) will fire whenever something breaks the beam, whether it is coming towards or going away from the camera. If this were a real test, I wouldn't be too interested in butt shots of Shaba. I'd like to only photograph her as she walked towards the camera. Cognisys-ink, the maker of the RangeIR, has a solution for this. Another product they make is called the StopShot, and it is a small control panel that is simply incredible. With the StopShot and two RangeIRs, I could program the StopShot so that the camera fires only when my subject is coming towards the camera. Here's how this works:
You'll need two RangeIRs. We'll call one A, and the other B. Programming the StopShot, I can set the device so that Shaba must first break B's beam before breaking A's beam. StopShot then allows the camera to fire. If Shaba is walking towards me, she'd walk through B, then A, and then the camera would fire. If she was walking away from me, she would walk through A first, then B, and the camera wouldn't fire.
Both RangeIR A and RangeIR B would be plugged into the StopShot. When the beam at B is tripped, the system is alerted and, if A's beam is broken in a preset amount of time, the camera will then fire. The StopShot can be programmed so that if A isn't broken within a certain period, B will reset itself. Otherwise, what could happen is B is broken but the cat turns around or backs up or moves off to the side, and A stays armed. By programming for this, A disarms after a set period and you're ready for the next pass. In this example, the camera is hard-wired to the StopShot, and not to the Ranges, which are also plugged into the StopShot.
Here's the other scenario. Shaba walks past the camera and trips RangeIR A, then continues and trips B. Because I programmed the StopShot so that B must be triggered first, the camera doesn't fire. Imagine the application of this with my barn swallows! Every time a swallow flew away from the camera nothing would happen. Otherwise, without this system, every time a swallow flew in either direction (towards the camera or away from the camera) the camera would fire. This ends up eating up memory card space and draining flash batteries.
Imagine how this could apply with a wary subject like an ocelot in the Pantanal. If my ocelot walked from A to B and the camera fired, I'd get a tail end view and, quite likely, the only chance at photographing the ocelot might be wasted as the flash or the sound of the camera firing might frighten the cat. If instead nothing happened, later, the ocelot might turn around and use the same trail, going from B to A, and I'd get the photo!
Of course, you can also program the StopShot to fire for a subject going from A to B (the tail end, in the above example), or to fire when either A or B was broken (imagine covering a broad area, like a bobcat feeding upon a deer carcass and tugging and hopping around the carcass), or when both A and B are broken simultaneously, in a X pattern where precise positioning is needed. Any scenario you're faced with, you can program the StopShot to deal with those parameters. That's pretty darn versatile!
So that's the RangeIR ! I leave in less than 24 hours for Africa and India, and I'm taking my RangeIR with me, where I hope to do some setups on nocturnal animals around our camps. If I have luck, you'll be seeing those images later.
A final word about the StopShot. If you visit their web site, you'll see that there are a huge number of accessories available, from lasers to passive infrared, sound trippers to vibration detectors, and I hope to be able to illustrate the application of these accessories in later postings. I haven't yet explored another product, the StackShot, which is designed for macro photography, especially in conjunction with software like the HeliconFocus. If you're interested in macro, check it out! I've used HeliconFocus for maximizing depth of field with macro subjects, and I'm hoping to do so with the StackShot. The results look incredible -- see for yourself.
If you are interested in this type of equipment but you know little about flash, or about how this type of gear can be used, either in studio or in the field, you might like to consider one of my Personalized Photography sessions. If we're not traveling, they can be scheduled fairly easily. Please contact our office.
Previous Tips, July 2009 onward
Gitzo Monopod 5561T Monopod
Easy Macro with Extension Tubes and Zoom Lenses
FotoSharp Camou Rain Covers
Canon 17mm T/S Lens
Locking Button for the Canon 7D
NIK HDR Program
Silver Efex Pro for Black and White Images
Beware the DELL Software Solution Rip Off
How and What We Pack for Trips
Canon Digital Learning Center
The Movie Mode with the Canon Mark IV
Batch Renaming in Bridge and CS5
Alternate Uses of some Bogen Products
Hoodman Products
Using High ISO and Live View for Focusing in Dim Light
Art Print Scams for Hungry Photographers
Hungry Vultures ruin vehicles in the Everglades
Use a Short Lens for Depth of Field
Get Professional Help!
Mini-Molar Bag
Access America Trip Insurance
Bogen Base for Macro Work
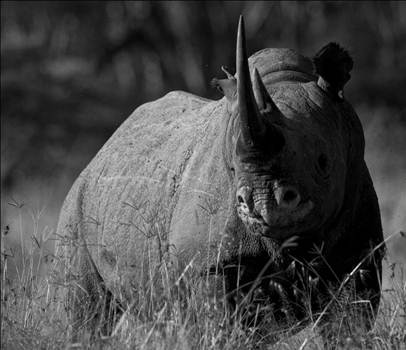
Archived Tips of the Month
prior to July 2009
Most of my original Tips of the Month for the last several
years are available through this link. The 'look' is from my
original web site, although if I ever have enough time I might redo these pages to match the new web site But that's not a high priority.
Check out our latest website,
mcdonaldwildlifephotos.com
where we'll be adding portfolios and eventually building up
a searchable data base for photo buyers. We've just started,
and the selection is limited, but it is still worth a visit!
Office Phone: (717) 543-6423
Or FAX us at: (717) 543-5342
Previous Tips, July 2009 onward
Extension Tubes and Zoom Lenses for easy Macro
FotoSharp Camou Rain Covers
Canon 17mm T/S Lens
Locking Button for the Canon 7D
NIK HDR Program
Silver Efex Pro for Black and White Images
Beware the DELL Software Solution Rip Off
How and What We Pack for Trips
Canon Digital Learning Center
The Movie Mode with the Canon Mark IV
Batch Renaming in Bridge and CS5
Alternate Uses of some Bogen Products
Hoodman Products
Using High ISO and Live View for Focusing in Dim Light
Art Print Scams for Hungry Photographers
Hungry Vultures ruin vehicles in the Everglades
Use a Short Lens for Depth of Field
Get Professional Help!
Mini-Molar Bag
Access America Trip Insurance
Bogen Base for Macro Work
Archived Tips of the Month
prior to July 2009
Most of my original Tips of the Month for the last several
years are available through this link. The 'look' is from my
original web site, although if I ever have enough time I might redo these pages to match the new web site But that's not a high priority.